Flash Movies are showing up all over the Internet.
Visit YouTube and search for Volcanoes and see what comes up:
Volcano Movie
Mount St. Helens
Kilauea
Great videos show up. Of course, you should preview all YouTube videos before showing in the classroom.
Enlarging to full screen means you can project on your SmartBoard or BigScreen.
Visit THIS PAGE and click on the Flash Movie about Volcanoes that would be fun to use on a SmartBoard. Very Interactive.
CONSIDER THIS: When Teaching Volcanoes, have flash movies running when your students enter the room and also when they are working on volcano-related activities: labs, foldables, worksheets, etc.
Saturday, November 8, 2008


Friday, November 7, 2008
Cloud Speed Game

Cloud Speed Game
Teaching clouds? Start today off with a Cloud Speed Game.
Run off enough pages of this Cloud Speed Game so you have one per team.
If you already have Teams set up, have them get into Color Teams with each team member taking a pencil with them.
"On your mark, get set, go!"
Every team member writes as many cloud names on the paper as possible.
When they are done, they need to holler, "Done, Red." Or whatever their color team is. Keep track as they yell. Collect the papers. While they go on to another assignment, such as recording the day's weather information onto their Week's Weather handout, check the papers for accuracy.
Announce the winners!
CONSIDER THIS: Start the day off with a fun team game that reviews material you've already taught. Then counter that frantic activity with some quiet but meaningful. Good way to start the day!
Wednesday, November 5, 2008
Setting up Labs

Lab Time should be Happy Time for both teacher and students.
Often it isn't.
Here's how to give yourself every chance that your Labs will go smoothly and your students will learn something in an organized, non-chaotic environment.
Start with using COLOR. Yes, COLOR!
The VERY first thing I did when I started each new school year was tape colored squares of paper onto each desk. I cut out two inch squares of the following colors of Astrobright paper: pink, red, orange, yellow, green, blue, purple. I would always have two tables of each color, except red, which had three including the work table in the back of the room. This was for larger than usual classes.
When I assigned students to seats, they were by default being assigned to a COLOR TEAM. Since two students sat at each table, this made each team have four students, three in a smaller class.
Often it isn't.
Here's how to give yourself every chance that your Labs will go smoothly and your students will learn something in an organized, non-chaotic environment.
Start with using COLOR. Yes, COLOR!
The VERY first thing I did when I started each new school year was tape colored squares of paper onto each desk. I cut out two inch squares of the following colors of Astrobright paper: pink, red, orange, yellow, green, blue, purple. I would always have two tables of each color, except red, which had three including the work table in the back of the room. This was for larger than usual classes.
When I assigned students to seats, they were by default being assigned to a COLOR TEAM. Since two students sat at each table, this made each team have four students, three in a smaller class.
I had a stack of small plastic baskets. Each year I would also tape two-inch squares of colored paper inside these baskets. I would have two baskets with yellow squares, two baskets with blue squares, etc. Three baskets with red squares.
Each table would get their corresponding team color basket for a lab with the required materials inside.
Some of the advantages of this system:
- I could call one person from each color up to pick up their materials (and return them). I would just say, "Send one person when I call your Color Team ." So two people would come up each time I called a color. Easier than having 14 kids all come up at once. (Same for return of materials.)
- In a cramped classroom, having baskets of materials meant some labs could be done at desks, not at the lab stations around the perimeter of the room. Nice some days not to have to push all the desks toward the front to make room.
- I could aways tell who returned a messy basket and give them a chance to clean it up before they lost clean-up points off their lab rubric.
- The Color Teams worked together as a team for labs, some assignments, and Team Games. When I reassign students to new desks, they changed Color Teams, too. I kept track of all the Color Teams during the semester and tried to give my students as many new Team members each time as possible.

CONSIDER THIS: Set up Color Teams. Great classroom management tool!
Using Google Maps
Google Maps can be used to show the Plate Tectonic Features of the planet Earth.
I discovered this quite by accident once when Google Maps had just added the Satellite Pictures to their site.
Go try it yourself: Go to the middle of the Atlantic Ocean. Click on Satellite. Do you see the Mid-Atlantic Ridge System? What Google's done here is spectacular! You can show your kids the bottom of the ocean!
You can show them the Mid-Atlantic Ridge!
You can show them tons of others things, too:
CONSIDER THIS: Add Google Maps to your Plate Tectonics unit!
FUN LINK: Click here for Google Maps.
Click here for Google Maps Guide for Teachers.
I discovered this quite by accident once when Google Maps had just added the Satellite Pictures to their site.
Go try it yourself: Go to the middle of the Atlantic Ocean. Click on Satellite. Do you see the Mid-Atlantic Ridge System? What Google's done here is spectacular! You can show your kids the bottom of the ocean!
You can show them the Mid-Atlantic Ridge!
You can show them tons of others things, too:
- The Mariana Trench in the Pacific Ocean where the Pacific Plate is subducting under the Eurasian Plate.
- The Juan de Fuca plate as it subducts under the North American Plate.
- The Andes Mountains where the Nazca Plate is subducting under the South American Plate.
- Northern India where the Indo-Australian Plate is Colliding with the Eurasian Plate, thus forming the Himalayan Mountains.
- Iceland where two plates are moving apart, splitting Iceland in half. NOTE: When in Iceland, click on Terrain, which shows where the glaciers "should" be. Then click back on "Satellite" to show how much is actually left. Astounding.
- Go to Hawaii. Show them how most of the Hawaiian Islands are undersea volcanoes formed by the Pacific Plate moving over a Hot Spot.
Click on "More" on the upper-right hand area and see Photos or Wiki entries.
Now, if you have a projection system hooked up to a Smartboard or big screen, you have just an ideal setup! When I've done this, my students were absolutely glued to the screen! They loved it.
Only thing is: be prepared for them to ask to see their own homes!
NOTE: The YouTube video at the beginning of this blog entry is not from Google Maps, of course, but shows the ocean as it appears on Google Maps. This video would also be a great teacher tool! Project this on your Smartboard/Big Screen! Let it play to the end and then "surf/browse" along the bottom for all sorts of great videos, including one called, "Approaching a Trench."CONSIDER THIS: Add Google Maps to your Plate Tectonics unit!
FUN LINK: Click here for Google Maps.
Click here for Google Maps Guide for Teachers.
Tuesday, November 4, 2008
The Fabulous Flexagon

I love introducing students to FLEXAGONS!
Flexagons are Fabulous!
Flexagons are flexible hexagons.
Flexagons can be successfully made and flexed by almost any middle schooler if they want to give it a try. I've seen an entire class of 5th graders get caught up in Flexagon Fury!
A Flexagon in a seemingly flat piece of cut and folded paper that has hidden surfaces. When you pinch and flex, you can get the hidden sides to show up.

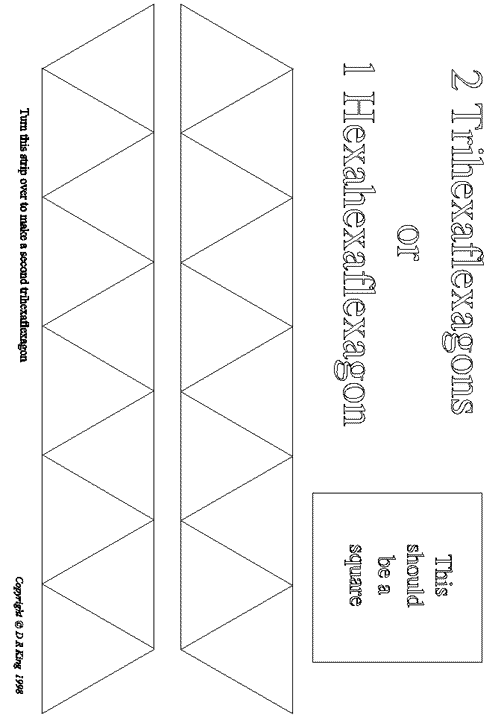
The easiest one is called the Trihexaflexagon. It has three surfaces, made of triangles (Tri) that fold to form a hexagon shape.
Click here for the simplest blank TriHexaFlexagon I could find. You can play with this yourself and by making one and color coding or number coding each face, you can backtrack to where you have numbers 1, 2, 3 on the sides that make each individual hexagon and then your students can color them.
Or click here to see a colored one and add the numbers in this order.
Click here to see an animation of the flexing of one of these Fabulous Flexagons!
This is one thing I would recommend: making and learning yourself first. Once you are comfortable making Flexagons, you can convey that confidence to your students.
++++++++++++++++++++++++++++++++++++++
The other really simple Flexagon in the Tetraflexagon. This series is made of squares, not triangles. There is a Tritetraflexagon (three surfaces) and a Tetratetraflexagon (four surfaces).

Click here to see the Tritetraflexagon and click here for a pattern. I had trouble finding a good blank pattern. Here's a image. Use the image to make your own pattern (or buy a book of them!). Put the "back side" letters on the front in parentheses. The students put those numbers on the back after cutting out the pattern.
Click here to see the Tetratetraflexagon and click here for a pattern. I had trouble finding a good blank pattern on the Internet. Make your own pattern. When I've made them, I put the "other side numbers" on the front in parentheses. The kids knew to put them on the back after they cut it out.
Flexagons are one of those secrets that good teachers understand. It is when we give kids difficult things to accomplish and show them the tools for success, that kids gain the self-confidence they need to face the world.
In other words, give a kid a really hard thing to do! Show him/her how to do it. Then watch them smile!
CONSIDER THIS: Add Flexagons to your BONUS BAG!
Subscribe to:
Posts (Atom)